All you need are a few simple ingredients to make this easy homemade buttermilk biscuit recipe for tender, buttery, fluffy biscuits with flaky layers.
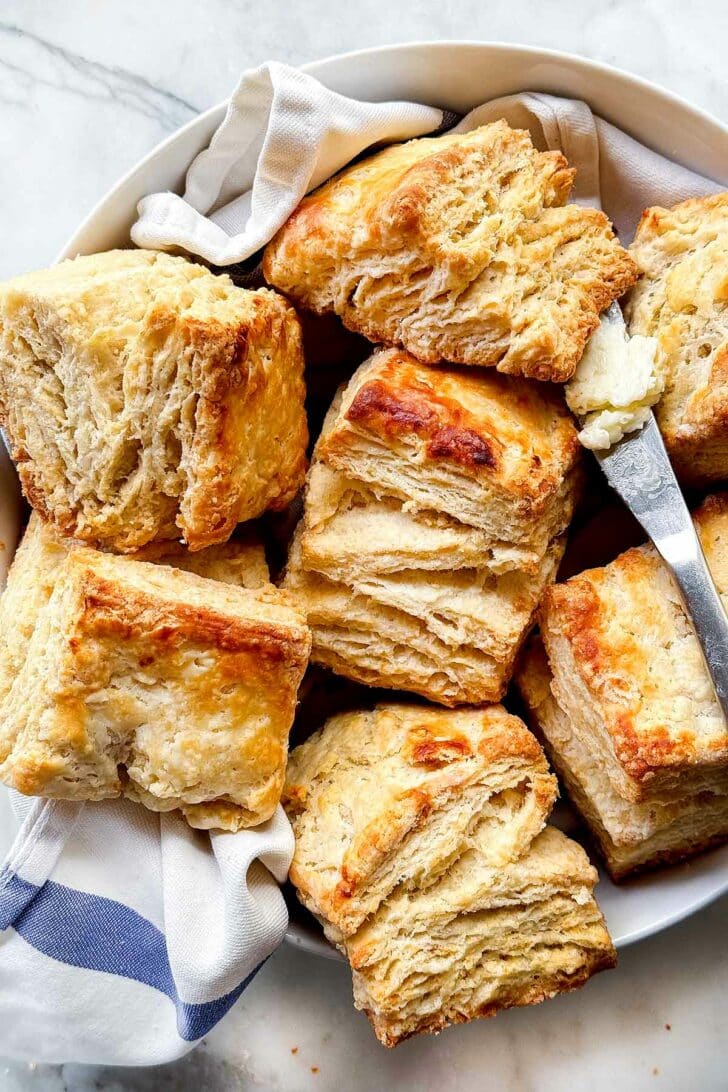
I have lots of classic breakfast and brunch recipes I love, like blueberry muffins, my favorite eggs Benedict, and breakfast potatoes. But there’s nothing like a homemade, buttery biscuit. My buttermilk biscuits recipe is the ultimate. These biscuits are everything a biscuit should be. They’re wonderfully buttery, tender, fluffy, and layered, thanks to an easy laminating technique of folding and rolling the dough several times. Like in the best butter pie crusts, the butter melts when baked to create steam and air pockets to make those delicate, flaky layers. It’s the best way to get a stacked, outrageously flaky biscuit. And once you try it, you’ll make biscuits all the time.
Why You’ll Love Them
- These homemade biscuits are so flavorful thanks to butter, buttermilk, a smidge of sugar, and the perfect amount of salt.
- These biscuits are laminated (folded and layered) for the ultimate flakiness and loft—they have layers for days!
- They have the perfect texture—a golden brown exterior with crisp edges (thanks to being cut into squares), and a tender, fluffy interior.
- The unbaked biscuit dough freezes beautifully.
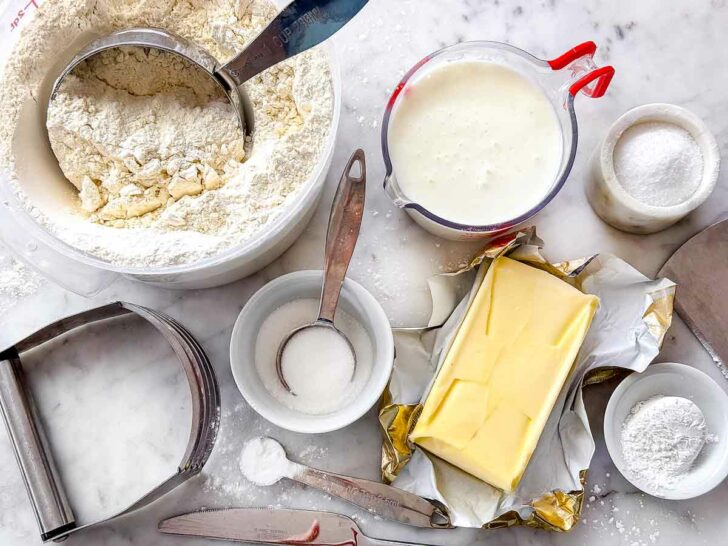
What’s in Buttermilk Biscuits
- Flour—Use all-purpose flour. I don’t recommend using self-rising flour for this, as it has the leaveners already mixed in and you can’t control your amounts that way.
- Sugar—Sugar helps encourage browning and also adds more flavor. The small amount doesn’t make the biscuits noticeably sweet, just more well-rounded in flavor.
- Baking powder—It’s an important leavener that gives these biscuits a nice rise
- Kosher salt—Salt always rounds out and enhances flavor.
- Baking soda—This also helps with leavening by neutralizing the acid in the buttermilk (these ingredients work in tandem to create fluffy, tender biscuits).
- Unsalted butter—Be sure it’s extra cold. I like to freeze mine for 15-20 minutes before grating it, then pop it back in the fridge until mixing time. I also like to use a European-style butter with a higher fat content (such as Kerrygold or Plugra).
- Egg—this is entirely optional, but I like whisking an egg with some buttermilk for brushing the biscuits before baking. The egg wash gives them a beautiful golden-brown sheen.
- Buttermilk—Be sure to use full-fat buttermilk and shake it well. The buttermilk adds moisture and flavor but also makes these biscuits perfectly tender and fluffy.
- Flaky sea salt—(optional), for topping the biscuits before baking
- Salted butter—(optional), for brushing the biscuits after they come out of the oven.
NOTE: If you don’t have kosher salt, you will only need half the amount of salt in the recipe.
Find the complete recipe with measurements below.
How to Make These Biscuits
- Mix the dry ingredients. Add the dry ingredients to a large bowl and stir with a fork or a whisk to combine.
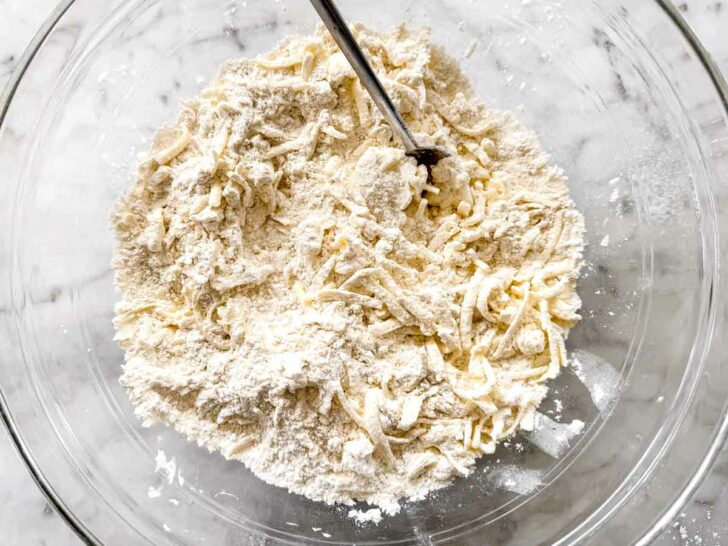
- Grate the cold butter then refrigerate again until mixing. I’ve found grated butter is easier to cut into the dough without overworking it. Grate cold butter then pop it in the freezer for just a few minutes before mixing it in.
- Cut in the chilled butter with a pastry blender. Add the cold butter to the flour mixture and toss so it’s evenly coated with the flour. Use a pastry cutter to work the grated butter into the flour. Use your fingers to sift through the mixture to be sure you don’t have any large pieces of butter. Most of the butter pieces should be pea-sized pieces (no larger) and coated in the flour.
Hydrate the Biscuit Mixture
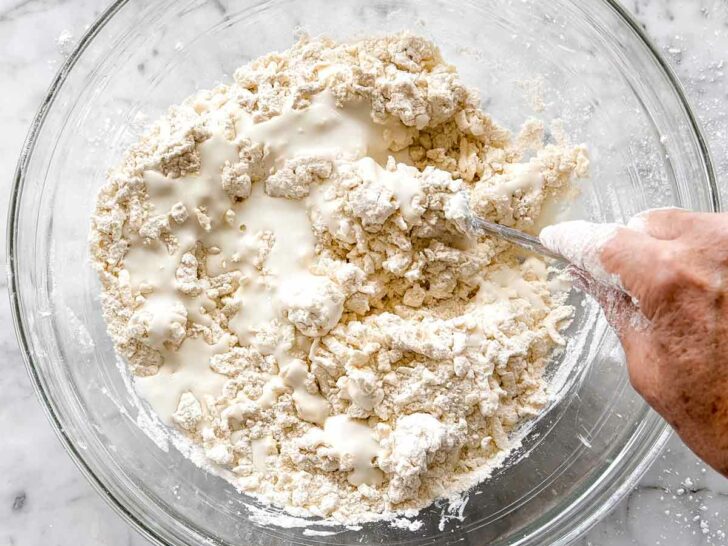
- Hydrate the mixture. Drizzle the flour mixture with half of the buttermilk, using a fork to incorporate. Add the rest of the buttermilk, continuing to mix with a fork. Adding the buttermilk in two stages helps ensure the dough mixture is evenly hydrated.
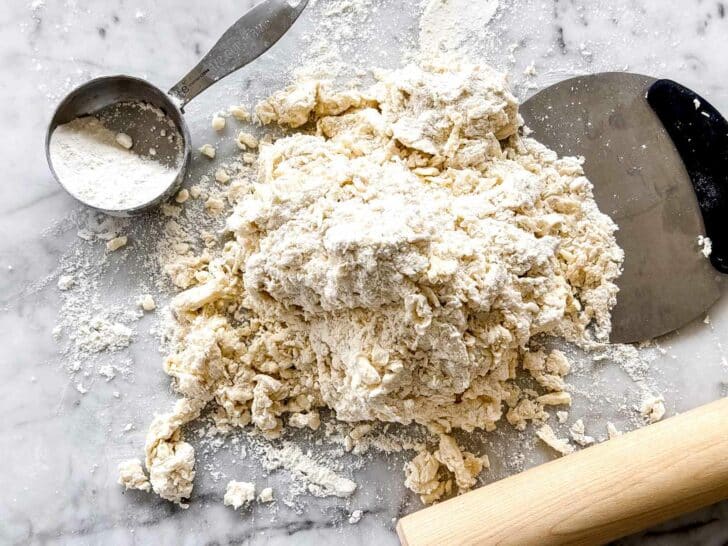
- Bring the dough together. Once the mixture begins to form clumps, use your fingers to toss the mixture and run along the sides and bottom of the bowl to scrape up any dough bits that may be stuck. Gently and briefly knead the mixture in the bowl until the dough begins to come together. Some pieces will hold together when you squeeze the dough, but there will also be some dry, floury bits.
Laminate the Dough to Form Extra Flaky Layers
What makes these biscuits particularly special is all of the layers. Those layers are achieved by using a technique called laminating (also used in croissants and pie dough). It’s a game-changer! The first folds will look pretty rough but as you continue the stacking and folding process, the dough will come together.
- Form the shaggy mixture into a cohesive dough. Lightly sprinkle your work surface with a few shakes of flour as needed. Don’t add too much or the biscuits will be dry and crumbly. Turn the shaggy mixture out onto a lightly floured work surface or countertop. The goal is to bring the mixture together into a shapable dough roughly 6 X 6-inch square and 1 ½ inches thick.
- Repeat the shaping, folding, and rolling process several times until the dough comes together. I alternate between using the bench scraper to fold, pile, and press the dough on the top and along all four sides, and the rolling pin to apply pressure when pushing down and rolling. Use the bench scraper to square it off and shape.
- Stack and smush. Use the bench scraper to cut the dough in half. Stack half of the dough on top of itself then press down on the stack. Roll it out into a square and use the bench scraper to shape it. Repeat this process three more times or until the dough is smooth and the edges are squared.
Cut the Dough
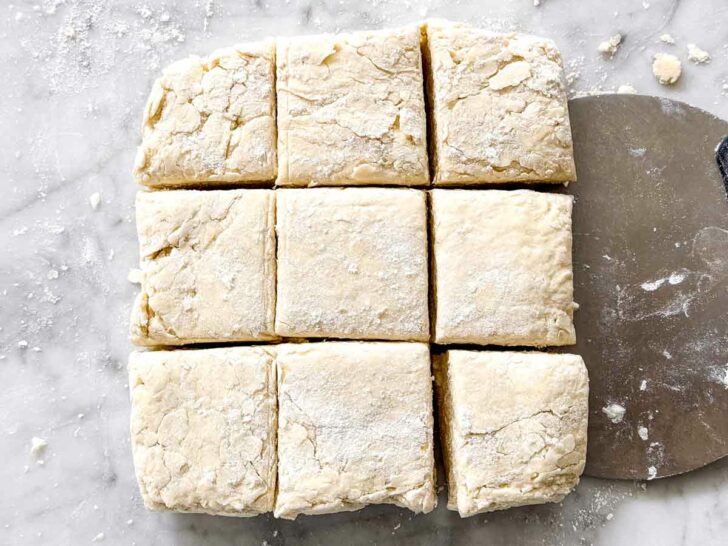
- Cut the biscuit dough. I cut my biscuits into squares instead of rounds so there’s no waste. Feel free to use a biscuit cutter if you prefer rounds. Roll the dough into a 6 x 6-inch square. Use the bench scraper to cut it into 9 even-sized squares. For larger biscuits roll the dough into a 6 x 9-inch rectangle, cut in half lengthwise, and cut each half into 6 even-sized squares.
- Chill biscuits before baking. Place the biscuits on a sheet pan lined with parchment paper then freeze or refrigerate for 15 minutes so the butter gets cold and firm.
- Brush and bake. While the biscuits are chilling, preheat the oven to 375°F. Brush the biscuit tops and sides with egg wash (this will help give them a beautiful bronzed sheen). Bake the biscuits for 20-25 minutes. Brush with melted salted butter after baking.
Tip: To get sharper edges on the corner pieces of the biscuits, use your bench scraper or knife to cut off a little from the sides.
Can I Make These Biscuits Round?
It may be somewhat controversial, but I’m going to say it: Square biscuits are better. You can use a biscuit cutter for this recipe, but I prefer cutting my biscuits into squares. That way I don’t have dough scraps and don’t have to re-roll the dough (which warms up and overworks the dough too much.) Plus, these biscuits just have more texture thanks to those 4 corners.
What to Serve with Buttermilk Biscuits
- Honey, jam, or Pimento Cheese
- The BEST Bloody Mary
- Berry Delicious Fruit Salad
- Sausage Breakfast Casserole
- THE BEST Breakfast Potatoes
- Bacon Broccoli and Potato Frittata
If you make this recipe, please let me know! Leave a ⭐️⭐️⭐️⭐️⭐️ rating on this recipe below and leave a comment, take a photo, and tag me on Instagram with #foodiecrusheats.
Buttermilk Biscuits Recipe
Ingredients
- 3 ¼ cups all-purpose flour, plus more for work surface , (406.25 grams)
- 2 tablespoons sugar
- 1 tablespoon baking powder
- 2 ½ teaspoons kosher salt
- ½ teaspoon baking soda
- 8 ounces unsalted butter , very cold (I recommend using a higher-fat, European-style butter, such as Kerrygold or Plugra-
- 1 ¼ cups full-fat buttermilk , chilled and shaken well (300 grams)
- 1 egg , optional (for egg wash)
- flaky sea salt , optional (for baking)
- 2 tablespoons buttermilk , (for egg wash)
- 4 tablespoons salted butter , melted, for brushing the biscuits after baking
Instructions
- Preheat the oven to 375°F.
- Add the dry ingredients to a large bowl and stir with a fork or a whisk to combine. Grate your butter (it should be VERY cold) on the large holes of a box grater. I like to do this over a sheet of wax or parchment paper so you can spread it out and avoid it clumping together. Add the cold, grated butter to the flour mixture. You may find you need to place the grated butter in the freezer for 5 minutes after grating to get it nice and cold again. Toss the cold, grated butter so it's evenly coated with flour. Sift through the mixture with your fingers to be sure you don’t have any large pieces of butter. If some of the butter pieces are in larger clumps, use a pastry blender to blend them up in the dry mixture (the pieces should be no larger than a pea).
- Drizzle the flour mixture with half of the buttermilk, using a fork to incorporate. Add the rest of the buttermilk, continuing to mix with a fork. Adding the buttermilk in two stages helps ensure the dough mixture is evenly hydrated. Once the mixture begins to form clumps, use your fingers to toss the mixture and run along the sides and bottom of the bowl to scrape up any dough bits that may be stuck. Gently and briefly knead the mixture in the bowl until the dough begins to come together. Some pieces will hold together when you squeeze the dough, but there will also be some dry, floury bits.
- Lightly sprinkle your work surface with a few shakes of flour as needed. Don't add too much or the biscuits will be dry and crumbly. Turn the shaggy mixture out onto a lightly floured work surface or countertop. The goal is to bring the mixture together into a shapable dough roughly 6 X 6-inch square and 1 ½ inches thick. Alternate between using the bench scraper to fold, pile, and press the dough on the top and along all four sides, and the rolling pin to apply pressure when pushing down and rolling. Use the bench scraper to square it off and shape.
- Use the bench scraper to cut the dough in half. Stack half of the dough on top of the other then press down on the stack. Roll it out into a square and use the bench scraper to shape it. Repeat this process 3 more times or until the dough is mostly smooth, taking care not to overwork it.
- Roll the dough into a 6 x 6-inch square. Use the bench scraper to cut it into 9 even-sized squares. For larger biscuits roll the dough into a 6 x 9-inch rectangle, cut in half lengthwise, and cut each half into 6 even-sized squares. To get neater, sharper edges on your corner pieces, use your bench scraper or knife to cut off a little from the sides.
- Place the biscuits on a plate or sheet pan lined with parchment paper then freeze them for 15 minutes so the butter gets cold and firm.
- When ready to bake, make your egg wash. Whisk the egg and 2 tablespoons of buttermilk together in a small bowl. Brush the biscuit tops and sides with your egg wash. Top with a sprinkling of flaky salt if desired. Bake the biscuits for 20-25 minutes, rotating halfway through (the tops should be nicely golden brown). Brush with melted salted butter after baking and serve warm or at room temperature. While best eaten the day they're baked, you can store the biscuits in an air-tight container for up to 3 days.
Notes
- If you do not have kosher salt, you will only need half the amount of salt the recipe calls for.
- I like to use a European-style butter with a higher fat content (such as Plugra or Kerrygold)—the butter is such a central ingredient in this recipe and the richer butter makes such a difference in the flavor of these biscuits.
- To get neater, sharper edges on your corner pieces, use your bench scraper or knife to cut off a little from the sides.
- These biscuits will keep in the freezer (unbaked) for 3-4 months. You can store leftover baked biscuits in an airtight container for about 2 days.
- To reheat biscuits, wrap them in foil or place on a sheet pan covered with foil and heat in a 300°F oven for about 15 minutes (or until warm). Remove the foil and broil on low for just a minute to help revive them even further.
Nutrition
Recipe Variations
This biscuit recipe is a blank canvas for a variety of flavors! Experiment and add any of the following ingredients and flavor profiles:
- Add freshly ground black pepper or everything bagel seasoning. Reduce the amount of kosher salt in the master recipe. Use 2 tablespoons of seasoning and 1 ½ teaspoons of kosher salt.
- Try fresh herbs like thyme, chives, scallions, dill, or rosemary and shredded cheese. Try Gruyere, sharp cheddar, goat cheese, or feta. Toasted walnuts, pecans, or chunks of ham would also be a great combo with the herbs and cheese. Add shredded cheese to the dough and sprinkle a little on top before baking.
- For sweeter biscuits, sprinkle the tops with raw sugar. Use a small spoon to indent the center of the biscuits before baking. Then, about 10-15 minutes before removing them from the oven, fill the indent with your favorite jam, or lemon curd.
- Brush your biscuits with honey butter or hot honey butter after they come out of the oven.
What is the Secret to a Good Biscuit?
- Fat= flavor; use a better butter. I was blown away by the big difference in my biscuits when I tried making them with European-style butter (versus a standard one). Butter is a central ingredient in these biscuits and the higher fat content delivers so much more flavor. I suggest Kerrygold or Plugra.
- Some like it hot? Not in the case of biscuits! Make sure the butter and buttermilk are very COLD. I like to put my butter in the freezer for about 15-30 minutes before grating it, and then again after grating it (just for about 5 minutes).
- A scale is your friend. For measuring flour, I go by the spoon and level method (meaning I use a scoop or spoon to add the flour to my measuring cup, and then level it off with a bench scraper or knife). I’ve included the three most important ingredient weights (the flour, butter, and buttermilk) for the recipe, so if you have a scale, there’s no need to worry about scooping and leveling your flour.
- Freeze before baking. Pop your biscuits in the freezer for 15 minutes before baking so the butter chills and sets up again.
Equipment
- I highly recommend using a kitchen scale and a bench scraper for this recipe. Weight varies greatly among flour brands and different methods for measuring—more on that in this article.
- Measuring tape is also helpful (although many bench scrapers also contain measurements).
- I like using a large, shallow mixing bowl to make my biscuit dough.
- Some biscuit recipes suggest using a food processor or your hands to incorporate the butter into the dough, but I prefer using a pastry blender. That way I can better control the size of the butter pieces. Working the butter in with your fingers can lead to warm butter and fewer layers.
- You can use your hands to form the dough into a square, but I find a rolling pin is very helpful, and this tapered one is good.
- A silicone pastry brush is helpful for brushing the tops of these biscuits with buttermilk before baking, and butter after baking. It’s easier to clean and the bristles don’t shed.
Storage Tips
- Biscuit dough freezes beautifully. If you don’t want to bake these immediately, freeze them until solid, then transfer them to a freezer-safe bag for up to 4 months.
- I do not recommend freezing biscuits after baking because they just don’t hold up as well.
- If you have leftover biscuits, store them in an airtight container for up to two days. When ready to eat, wrap them in foil and warm in the oven or toaster oven at 300°F for about 15 minutes. You can unwrap them from the foil and finish them under a low broiler for about a minute.
More Breakfast and Brunch Recipes to Try
- Deviled Eggs
- Eggs Benedict
- Pimento Cheese
- THE BEST Cinnamon Rolls
- Gwyneth’s Blueberry Muffins
- How to Make the Perfect Mimosa
We send good emails. Subscribe to FoodieCrush and have each post plus exclusive content only for our subscribers delivered straight to your e-mail box.
Follow me on Instagram, Facebook, Pinterest for more FoodieCrush inspiration.
As always, thank you for reading and supporting companies I partner with, which allows me to create more unique content and recipes for you. There may be affiliate links in this post of which I receive a small commission. All opinions are always my own.






Carlin
Oh my goodness these were good. A little bit of work and not perfectly picturesque, but delicious. Layers upon layers. They did fall over but look like the picture.
Hayley
Thank you for sharing, Carlin—we’re so happy you tried them and loved them! :)